Monday, March 29, 2010

Family Chalkboard


CREATE a large family chalkboard from a picture frame with pockets!


Items needed:
chalkboard vinyl found HERE .
Large picture frame without glass, any size works!
Scissors and packaging tape to seal the back of the frame.
One 10 year old Boy who loves to build!
chalk and eraser(damp cloth works best).
Fabric and interfacing for pockets
Constructing the POCKETS:
You will need fabric and interfacing to make pockets to store chalk and eraser. (Pockets measure 8" X length of frame).

For pockets- make two long tubes using two fabrics right sides together with interfacing on back of fabrics. Sew along both horizontal edges. Leave both ends open for turning. Place fabrics together, sew one edge for bottom of pockets.

I divided the vertical fabric into five pockets. I glued the pockets to the vinyl with a high temperature glue gun. I prefer vertical stripes, it makes a easy guide for dividing the pockets.


Constructing Frame:
A picture or cardboard picture from frame that works well with contact paper
Cover your board with chalkboard contact paper or chalkboard vinyl.
If you are using vinyl, use packaging tape to secure vinyl firmly into place.
Table knife for moving staples up and down.

I used a very large frame with a cardboard picture that was not being used, any second hand stores would be a great place to find a suitable frame! We took the glass out and placed it on top of a desk, which will be used to make a desk top cover with old photos under the glass.

A great project to make with your kids!

Enjoy!


Thursday, March 25, 2010

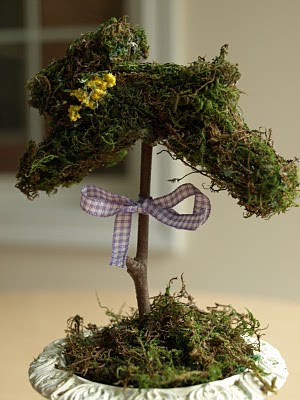
Easter Bunny Topiary


Hello Friends!

How CUTE is this? Let's make one! A great tutorial is found HERE from Less-Than-Perfect Life of Bliss.

I may not get to it until next year, but I will know where to find it! Someday, I would like to have a big party of crafting all day at my house enjoying the beautiful sunshine outdoors, along with Easter peeps, Jordan almonds, cupcakes and a large Pepsi!

Wishing you all a happy, productive and sweet spring break!

Tuesday, March 23, 2010

Children's Sketch and Draw Tag Along Wallet


Sew What's new?


Fill your wallet with notebooks, stickers, markers, colored pencils, chapstick, tissues etc.

I started making these fun little childrens wallets a few days ago. Of course, I had a lot of input from my little daughter. We added plastic fabric lining under the crayons, along with a handle, a few flowers and mini composition books.

These wallets are great for on the go, Easter baskets, Birthdays, travel, doctor appointments and so on! They are super cute for kids! My daughter would like to make one for everybody in her kindergarten class! We settled on taking one for show and tell.

The pattern is from Jennifer Casa, a great tutorial pattern with permission to sale on etsy.

I will be making more of these fun little wallets for boys and girls coming soon to my etsy.

Have a happy creative day!
I'm joining Creations by kara.

Sunday, March 21, 2010

Red and White Polka Dots With Cherries On Top


Meet the adorable Miss Alani!

I have a weakness for aprons, especially children's aprons! I guess you could say, I have a lot of weaknesses! One weakness that has taken over is FABRIC-- so many fabrics, so little time!

My list of projects to finish just keep growing and growing more each day! One project that keeps slipping away is CLEAN and ORGANIZE my sewing room! I walk into my sewing room to CLEAN and ORGANIZE and walk back out with a red and white polka dot with cherries on top apron!


I will tackle my sewing room this week, or maybe not! I have more polka dots sitting on my cutting board! It's so hard to clean and organize when there are so many adorable fabrics and projects staring at you along with a love to CREATE! Does anyone else have this problem? (The funny thing is, I can't find anything when I clean and organize my sewing room anyway. It's kindof like, I can't function when the house is quiet and everyone is gone. )

Stay tuned for more projects and aprons coming soon to my etsy shop!

Thursday, March 18, 2010

Table Topper


I've been decorating a lot of table tops lately. I love this idea!
This vintage table doubles as a desk and a bedside stand. To soften the look for the bedroom, cover the top with fabric and fasten it along the edges with upholstery tacks.
Spring is in the air! A beautiful 78 degrees today!
(Inspiration-BHG)

Tuesday, March 16, 2010

Sugar Biscuits Baby Quilts


Adorable baby quilts!
Free Download! I love their easy to follow patterns.

Fabrics by: Wilmington Prints
Pattern available
HERE from Fons and Porter!
Kits available at www.shopfonsandporter.com

Enjoy!

Monday, March 15, 2010

Cute As A Button!


New Scripture Bags have arrived to my ETSY shop!
Great for EASTER! These bags are so fun to create with all the new and fabulous vibrant fabrics available for spring and summer!


Rich, vibrant colors with polka dots, floral prints, bunny prints along with Spring flowers that are detachable to wear as a hair clip in your hair!

Celebrate!
Make some "Bunny" happy!
Spring into Summer with bags for many different occassions!


Several bags to choose from! Scripture bags have reinforced handles, fully lined, interior pocket and exterior pockets available.

Wishing you all a happy month of warm sunshine and spring flowers!

My favorite creation for the day! The greatest art of all is from our children's heart and hands!
"Girls just wanna have FUN!"

Sunday, March 14, 2010

Bunny Face Cupcakes


Ingredients
1 12-oz. can vanilla frosting
12 cupcakes, any flavor
2 cups sweetened flaked coconut, chopped in food processor
1/4 cup pink decorating sugar
12 marshmallows
24 thin pretzel sticks
12 mini marshmallows
24 brown M&M's minis
12 pink heart candies, such as Runts
6 black licorice laces
Preparation
1. Spoon 2 Tbsp. vanilla frosting into a small ziplock bag. Frost cupcakes with remaining vanilla frosting. Roll tops of frosted cupcakes in coconut to cover.

2. Place pink sugar in a small bowl. Using scissors, cut large marshmallows in half crosswise. Press cut side of each marshmallow into pink sugar to make ears. Insert a pretzel stick into 1 short end of a marshmallow ear. Insert pretzel-stick end into cupcake to make ear stand up. Repeat with another pretzel and marshmallow ear; place second marshmallow ear next to first. Repeat with remaining marshmallows and pretzels, placing 2 ears on each cupcake.

3. Snip a small corner from ziplock bag with vanilla frosting. Using scissors, cut mini marshmallows in half crosswise to make cheeks. Pipe small dots of frosting and attach the mini M&M eyes, heart-candy nose and cheeks. Cut licorice into 1 1/2-inch pieces and insert as whiskers. Repeat with remaining cupcakes.

Tuesday, March 9, 2010

Hello Friends!


Hello Friends! New scripture bags soon to come!
Wishing you all a beautiful warm day!

If it's not so warm in your area.....here's a cute Mary Engelbreit Scarf to make!


Try your hand at sewing with this cute and cozy fleece scarf. Instructions for a matching hat and mittens and 10 other adorably soft fleece projects are available in the “Be Warm Inside and Out” booklet from Leisure Arts.

Materials
3/8 yd red fleece
1/8 yd blue fleece
1/8 yd yellow fleece

1/4 yd black fleece
1/8 yd white fleece
Scrap of green fleece
Tracing paper
Freezer paper
1/2″ diameter white pom-poms
Red, green, yellow and black embroidery floss (six strands of each)
Fabric glue
Two 10 1/2″ lenths of red pom-pom fringe
Two 11″ lengths each of 3/8″ wide red and black grosgrain ribbon

Here’s How
1. Cut a 10 1/2″ x 56″ strip from red fleece. Cut two 5″ x 10 1/2″ pieces from black fleece and six 1 1/2″ x 10 1/2″ strips from white fleece. Cut two 2 1/2″ x 10 1/2″ strips from blue fleece and two 1 1/4″ x 10 1/2″ strips from yellow fleece.

2. Matching edges, sew a black piece to each end of red strip, then sew a blue strip to each black piece and a yellow strip to each blue strip. Cut slits 1 1/2″ apart across black piece to within 1/16″ of seams. #2#(click here to see a diagram)# Weave white strips through slits in black pieces to make a checkerboard pattern; pin ends of strips to secure.

3. Use this flower pattern to cut two sets of flowers from fleece. For leaf veins, stem stitch down center of each leav with green floss. Blanket stitch a flower set to center of each blue strip with coordinating floss. Blanket stitch along long edges of scarf with black floss. Click here for a stitching guide. (For a quicker substitute, try Mary’s buttons or appliqués.)

4. Glue fringe along short edges of scarf. Folding ends under 1/4″, layer and glue black, then red ribbon over flange of fringe. Glue pom-poms to scarf.

Some Notes on Working with Fleece:
Match right sides and use a 1/4″ seam allowance for all sewing. Yardage amounts listed are based on 60″ wide fleece with an estimated “usable width” of 56″ after trimming selvages. To sew seams, use a narrow zigzag stitch with a medium stitch length (approximately 1/8″) to reduce stretching of the fleece. Trim seam allowances to 1/4″ after sewing.


Sunday, March 7, 2010

What Christmas Means to Me


The brisk, quiet, star-lit nights
With people on the go
The hustle and bustle of shopping
While praying for it to snow

Decorating the tree and the house
A Nativity Scene on the lawn under the sky
Angels placed all around it
For all to see, who come by

Baking cookies and other treats
Addressing cards to send to friends
It can be busy and hectic
But you hope it will never end

Everyone is usually happy
With smiles all around
People greet others cheerfully
It is such a joyous sound

Children are filled with anticipation
Wondering what gifts they might get
Parents hide these treasured packages
So the children won’t see them yet

Many parties are held
Where people get together for fun
They talk about how exhausted they’ll be
Once the season is done

People go off their diets
And eat much more than they should
It’s difficult to pass up the food
Because all of it is so good

People start getting serious
As the special day draws near
Carolers sing wonderful songs
They are a joy to hear

The special day known as Christmas
Is the anniversary of Jesus’ birth
It’s a day that is held most holy
All around the earth

As we gather in churches on Christmas
Remember to thank God above
For sending His Son to redeem us
And filling our hearts with love

By Beverley Lawyer

Monday, March 1, 2010

Let the Sunshine in!


Welcome March 1st! Welcome Spring!
Use the talents you possess--for the woods would be very silent--if no birds sang except the best.

Welcome to my Arizona flowers and a beautiful 74 degrees! I love Arizona sunshine! The warmth of sunshine and the beauty of flowers never felt so good! Who wants to do spring cleaning when it is so beautiful outside? Do something FUN!